Heard of Geelong? Good! You are over half way from Melbourne and probably only another 20 minutes til you get to the Bellarine Peninsula proper. It's home to lovely spots like Ocean Grove, St Leonards, Portarlington and Queenscliff, where the ferry takes you across to the Mornington Peninsula.
I headed to the Harvest & Graze Festival on the weekend with the lovely Ms Maude to see what
Monday, January 21, 2013


Saturday, January 5, 2013
It's been a long sabbatical...and a slight change of direction
Hello!? Are you still there?? Surprised if you still are but quietly hoping that I can entice you with this latest instalment.
I've been away on holidays. Certainly not for 12 months - which is when I posted last - but long enough and to an exciting enough destination that my interests have been peaked not just in food, but also in photography. Another creative hat for me to wear.
So, this is where I went.....
I've been away on holidays. Certainly not for 12 months - which is when I posted last - but long enough and to an exciting enough destination that my interests have been peaked not just in food, but also in photography. Another creative hat for me to wear.
So, this is where I went.....
Monday, March 12, 2012
Zucchinis - how big can they grow??
With this my first blog post after a little spell, you will be pleased to know that all is not silent nor inactive. I have been busy fossicking throughout summer enjoying the delicious produce including that from my own garden.
Sunday, December 4, 2011
What are you Drinking this Silly Season??
I met some interesting people today over brunch on a rather chilly December day here in Melbourne. Having a few northern hemisphere dining companions at the table, I felt the weather more in keeping with where they all came from! Bbbbrrrrr....
Then someone pipped up and asked if I knew of a good punch recipe. Yay! We were back to thinking about long summer days, Pimms with cucumber at the polo, and tropical icy poles that run the risk of melting before we've had the chance to get to the stick!!! Even the good old Billabong (chocolate of course) brings back lots of memories of days at the municipal pool in Cairns. At the age of 10 (back in 1979), there wasn't much else happening. How life has changed....
Whilst the idea of a deliciously warm mulled wine, or even a butterscotch schnapps, congers up images of open fires, snow capped mountains and 5 layers of clothing (!!), I still think you can't beat a refreshing punch on a warm summer's day - even Christmas Day - to balance out the over consumption of alcohol and food.
So, here's a little recipe to try, and share, during the coming festive season:
Refreshing Punch
1 cup fresh orange juice
1 cup pineapple juice (canned is OK to use)
1/4 cup fresh lemon juice
1 cup strong black tea
1 bottle ginger ale
1 tin of crushed mixed fruit set into ice cubes
sugar syrup to taste - this is made by mixing together 1 cup of water with 1 cup of sugar - dissolve sugar, bring to the boil for 5 minutes, then allow to cool
Simply combine all ingredients together and use the sugar syrup (around 2/3 cup) to sweeten. The frozen cubes of crushed tinned fruit will keep it cool and as they melt add a yummy texture to the drink!
This punch takes me back to family and birthday parties we had when I was growing up. The punch bowl had hooks around the outside to allow the cups to hang off it. Not sure if they still sell these but it's a nice bit of nostalgia. Cheesy some would say!
So, after the indulgence this season, grab a glass of this and enjoy!!
Then someone pipped up and asked if I knew of a good punch recipe. Yay! We were back to thinking about long summer days, Pimms with cucumber at the polo, and tropical icy poles that run the risk of melting before we've had the chance to get to the stick!!! Even the good old Billabong (chocolate of course) brings back lots of memories of days at the municipal pool in Cairns. At the age of 10 (back in 1979), there wasn't much else happening. How life has changed....
Whilst the idea of a deliciously warm mulled wine, or even a butterscotch schnapps, congers up images of open fires, snow capped mountains and 5 layers of clothing (!!), I still think you can't beat a refreshing punch on a warm summer's day - even Christmas Day - to balance out the over consumption of alcohol and food.
So, here's a little recipe to try, and share, during the coming festive season:
Refreshing Punch
1 cup fresh orange juice
1 cup pineapple juice (canned is OK to use)
1/4 cup fresh lemon juice
1 cup strong black tea
1 bottle ginger ale
1 tin of crushed mixed fruit set into ice cubes
sugar syrup to taste - this is made by mixing together 1 cup of water with 1 cup of sugar - dissolve sugar, bring to the boil for 5 minutes, then allow to cool
Simply combine all ingredients together and use the sugar syrup (around 2/3 cup) to sweeten. The frozen cubes of crushed tinned fruit will keep it cool and as they melt add a yummy texture to the drink!
This punch takes me back to family and birthday parties we had when I was growing up. The punch bowl had hooks around the outside to allow the cups to hang off it. Not sure if they still sell these but it's a nice bit of nostalgia. Cheesy some would say!
So, after the indulgence this season, grab a glass of this and enjoy!!
Monday, November 28, 2011
Something compelling to share - in the lead up to Christmas
I know - it's been a while since I last posted on my blog. I may have been a bit moody and perhaps occasionally broody! But alas, you can never take away my desire to be a foodie!! A poet, I am not!!!!
I had another post to share with you, that I still will (next week) but I feel compelled to share the following link with you especially in the lead up to Christmas.
I don't know about you, but pork is a traditional staple at my family's Christmas table. As it is for a good portion of the year - ham sandwiches, roast pork (with that delicious crackling), pork chops, pork sausages, salami, the list goes on. Oh, and who could forget BACON!!!!
I have been challenged of late, having watched a number of programs designed to bring awareness to how animals are treated in the lead up to any meat cut making its way onto our dining tables. My eyes have been opened to the level of cruelty and abuse that occurs in abattoirs across the world and ALSO pleasantly, I have seen wonderful images of very happy animals, treated with absolute respect and admiration. What a life for a pig to be left roaming in an apple orchard, just waiting for his next meal to drop from heaven!!! Mind you, they still make their way onto our plates - we are, after all, talking about farming one of the longest established and most important industries across the globe.
In saying this, I really urge you to take a look at this short video issued by Animals Australia. Please THINK about what you eat this Christmastime, as I will be. I am also encouraging my family and friends to do the same. With respect, I know you will make your own decisions but please ask the right questions and perhaps spend a little more on your meat this coming season, for the animals' sakes.
Final Moments — stories from inside an Australian abattoir
I will be back to you next week with a far more happier edition!
With a tear in my eye - yes, I have been crying - writing to you again soon!
I had another post to share with you, that I still will (next week) but I feel compelled to share the following link with you especially in the lead up to Christmas.
I don't know about you, but pork is a traditional staple at my family's Christmas table. As it is for a good portion of the year - ham sandwiches, roast pork (with that delicious crackling), pork chops, pork sausages, salami, the list goes on. Oh, and who could forget BACON!!!!
I have been challenged of late, having watched a number of programs designed to bring awareness to how animals are treated in the lead up to any meat cut making its way onto our dining tables. My eyes have been opened to the level of cruelty and abuse that occurs in abattoirs across the world and ALSO pleasantly, I have seen wonderful images of very happy animals, treated with absolute respect and admiration. What a life for a pig to be left roaming in an apple orchard, just waiting for his next meal to drop from heaven!!! Mind you, they still make their way onto our plates - we are, after all, talking about farming one of the longest established and most important industries across the globe.
In saying this, I really urge you to take a look at this short video issued by Animals Australia. Please THINK about what you eat this Christmastime, as I will be. I am also encouraging my family and friends to do the same. With respect, I know you will make your own decisions but please ask the right questions and perhaps spend a little more on your meat this coming season, for the animals' sakes.
Final Moments — stories from inside an Australian abattoir
I will be back to you next week with a far more happier edition!
With a tear in my eye - yes, I have been crying - writing to you again soon!
Saturday, September 3, 2011
Eat your Greens!!! Fresh and Raw!!!
It's been a frantic few weeks completing an amazingly full-on work assignment but now I'm back to talk about my real passion: seasonal food.
The smell of Summer is in the air but before we get there, Spring will no doubt keep us entertained with some amazing produce as I'm already starting to see at the markets - strawberries, tomatoes, cucumbers, avocadoes and capsicums at a far more decent price!!! What is taking your fancy???
I'm loving the gorgeous greens that I'm getting either off my balcony or out of my veggie plot at the moment. Whether it be perpetual spinach, parsley or silverbeet, it is all tasting so rich, fresh and full of flavour.
 If you know who Popeye is, you'll know that spinach of any sort is good for you. In fact, it's better than that - it's loaded with calcium, folic acid, vitamin K and iron. As are other such dark greens as kale, collards, Swiss chard, turnip greens and bok chok.
A few added extras with spinach include its rich supply of vitamin C, fibre, lutein, bioflavanoids and carotenoids. What a powerhouse!!!!!
Better still, you can eat it raw or cooked. Any food eaten raw means you are eating it in its purest form. No loss of any of that pretty expansive list above.
My gorgeous SydGel friend concocted a fabulous salad earlier this year - everything was raw. And now is the time to start working on such meals again. The winter stodge cravings should soon be behind us so let's get busy preparing salads full of leafy greens, lots of other raw goodies and a spectacular home made dressing to bring it all together.
 So, my recipe this blog is a delicious salad dressing that should work with any raw salad or veggie mixture you bring together. Don't overdress as you still want to taste the nudity of the food. Just pretend the dressing is the underwear rather than the clothes!!
Deliciously Easy Dressing (that keeps in the fridge if you don't use it all at once)
6 tablespoons good olive oil (good being the most important word)
2 tablespoons Dijon mustard
2 tablespoons red or white wine vinegar
1 teaspoon sea salt
1 teaspoon ground black pepper
Try using an old jar that has been completely clean and is free of any residual odours from whatever was stored in it previously. Shake all ingredients together thoroughly and then toss through raw ingredients.
This mix should be adequate for a salad that serves 4 people. YUM!!
The smell of Summer is in the air but before we get there, Spring will no doubt keep us entertained with some amazing produce as I'm already starting to see at the markets - strawberries, tomatoes, cucumbers, avocadoes and capsicums at a far more decent price!!! What is taking your fancy???
I'm loving the gorgeous greens that I'm getting either off my balcony or out of my veggie plot at the moment. Whether it be perpetual spinach, parsley or silverbeet, it is all tasting so rich, fresh and full of flavour.

A few added extras with spinach include its rich supply of vitamin C, fibre, lutein, bioflavanoids and carotenoids. What a powerhouse!!!!!
Better still, you can eat it raw or cooked. Any food eaten raw means you are eating it in its purest form. No loss of any of that pretty expansive list above.
My gorgeous SydGel friend concocted a fabulous salad earlier this year - everything was raw. And now is the time to start working on such meals again. The winter stodge cravings should soon be behind us so let's get busy preparing salads full of leafy greens, lots of other raw goodies and a spectacular home made dressing to bring it all together.

Deliciously Easy Dressing (that keeps in the fridge if you don't use it all at once)
6 tablespoons good olive oil (good being the most important word)
2 tablespoons Dijon mustard
2 tablespoons red or white wine vinegar
1 teaspoon sea salt
1 teaspoon ground black pepper
Try using an old jar that has been completely clean and is free of any residual odours from whatever was stored in it previously. Shake all ingredients together thoroughly and then toss through raw ingredients.
This mix should be adequate for a salad that serves 4 people. YUM!!
Sunday, August 14, 2011
Risotto - the labour of love no matter what, where or when!!!
Perhaps I'm living in a too perfect world, but I was always under the impression that some things just took time - things like paint drying, nail polish not smudging, plants growing, bananas ripening, risotto being prepared from scratch...
At the same time, melt butter over low/med heat - add mushrooms and cook down until soft.
Add truffle oil, mix through and set aside to absorb flavour.
Heat olive oil in heavy based saucepan over medium heat and sauté onion & garlic until soft.
Add rice and mix thoroughly to coat with olive oil. If need be, add an additional tablespoon.
Stir constantly and grains of rice should start to tinge golden brown. About 2-3 minutes.
Turn the stock off simmer and start to add to the rice, a ladle at a time.
Keep the lid on the stock after each ladle addition, just to keep it as warm as possible.
Stir continuously and wait until absorbed before adding more stock.
Continue this process until all stock is absorbed.
When adding last amount of stock, also add mushroom mixture.
Check rice to taste - cooking time by now should be around 25-30 minutes. Rice should be firm but cooked through.
If necessary add a little more liquid - water is fine - to assist the process.
Finally add Parmesan, stir through, then the parsley.
Cracked pepper at the end and you see good to serve.
Seems with the last one on my list, I am apparently wrong.

I dined at a newly established restaurant in Melbourne recently (no names) & was excited to be stationed at the bar, watching the chefs plate up the night's menu for the eager diners, including myself and the devine Miss M.

However, when it came to the arrival of my own dish, a delicious sounding risotto, I was a little perplexed to see a large container of precooked rice appear from the chiller and - SHAZAM - my 30 second dish was in front of me, steaming hot! WHAT!?!?!?

And as I expected, the flavour was nowhere to be tasted.

To me, risotto is a labour of love. From the decision as to what key ingredients the add, the addition of wine to the stock, knowing that the rice quality is imperative, through to the constant stirring and finally, the end result.
I've ordered risotto before at restaurants and whilst I haven't seen it prepared in front of me as I did recently, I'm confident that most people understand that this dish, like a souffle, takes time - and diners are prepared to wait.

So, here is one of my favourites combination that, if you love mushrooms, will hit the spot.
1 onion, finely choppedPrepare all base ingredients and bring stock to the boil, then reduce to a simmer.
1 clove garlic, finely chopped
2 tablespoons olive oil
3/4 cup good quality arborio rice
2 1/2 cups good stock (chicken, veal or veggie) with 1/2 cup of this quantity being white wine
90g butter
250g mushrooms, of your choosing, sliced
1 teaspoon truffle oil
1/2 cup parmesan
1/4 cup finely chopped parsley
At the same time, melt butter over low/med heat - add mushrooms and cook down until soft.
Add truffle oil, mix through and set aside to absorb flavour.
Heat olive oil in heavy based saucepan over medium heat and sauté onion & garlic until soft.
Add rice and mix thoroughly to coat with olive oil. If need be, add an additional tablespoon.
Stir constantly and grains of rice should start to tinge golden brown. About 2-3 minutes.
Turn the stock off simmer and start to add to the rice, a ladle at a time.
Keep the lid on the stock after each ladle addition, just to keep it as warm as possible.
Stir continuously and wait until absorbed before adding more stock.
Continue this process until all stock is absorbed.
When adding last amount of stock, also add mushroom mixture.
Check rice to taste - cooking time by now should be around 25-30 minutes. Rice should be firm but cooked through.
If necessary add a little more liquid - water is fine - to assist the process.
Finally add Parmesan, stir through, then the parsley.
Cracked pepper at the end and you see good to serve.
I particularly love the buttery flavour of the truffled mushrooms and how they complement the rice texture.


Give it a go and let me know how it comes together for you. Great served with a rocket salad, lightly dressed with balsamic!


Other favourite variations include:

Leek, lemon & pea

Bacon, onion, lemon & spinach

Beetroot & goats cheese

and

Strawberry, Chardonnay & blue cheese - vive la France!!!!
Saturday, July 30, 2011
The Rise and Rise of Hairy Canary.....and Sourdough.
I can't believe it! Hairy Canary, one of the first ever cafes (well, its more than a cafe really) that I visited in Melbourne way back in 2000 (well before the dream of moving here had become a reality), turns 15 this year!!!! That's a great feat for a Melbourne dining spot and one that really has stayed true to its traditions. It's look, feel and overall concept hasn't changed in all that time - and as they say, if it ain't broke, don't fix it.
I have actually been there twice this week - once with my Sydney friend Monique and her daughter, Madison and the second time to take rest whilst 'declaring my love for Melbourne' at Melbourne Open House.
I noticed on the menu that the kitchen made their own sourdough and it got me thinking about the rise....and rise of sourdough. Gone are the days of straight, stock standard wholemeal, wholegrain, multi-grain and white breads. It seems that sourdough is the preferred choice.
So, I thought I'd check out exactly what it is about sourdough that is making it so popular these days.
Sourdough is the oldest form of leavened bread in the world, dating back to 1500BC. In more modern times, San Francisco became a hub for the 'loaf' during the Gold Rush, and is now sold down at Fisherman's Wharf filled with chowder. In fact, saw this for myself when I was over there in 2009. It's a pity that the loaf is often thrown to the seagulls and not eaten. Seems to defeat the purpose of its goodness.
The way that bakers prepare bread now is very different to some 60 years ago. Some of the mainstream bakeries can now produce a loaf of bread in just 40 minutes! In the past, bakeries would run two shifts throughout the night because the dough was fermented properly and it needed time for this to occur...and manpower.
Free of commercial yeast, sourdough bread has an aroma and distinctive flavour all of its own and is naturally leavened by a fermented starter. Sourdough also has a mild effect on blood sugar, meaning that if you eat sourdough, it will not increase your blood sugar. This is great for Type 1 & 2 Diabetes sufferers.
Only when wheat gluten is properly fermented is it healthy for human consumption. When not it is potentially one of the most highly allergenic foods we eat. People with allergies to commercially yeasted breads may not have the same sensitivities to naturally leavened whole grain sourdough bread.
For the rest of us healthy folk, what's important for us to realise is that naturally leavened bread, because of its inherent beneficial ferments, slowly recreates the population of friendly lactobacillus digestive bacteria in the absorption tract. The end result is a recovery of digestion and proper elimination by the effective action of friendly bacteria. Numerous studies demonstrate that populations with the highest fibre intake have the lowest incidence of colon cancer.
Instead of supplying a recipe this blog edition, I'm going to recommend some of my favourite sourdough makers around the traps.
Melbourne:
Dench Bakers
Brisbane:
Sol Breads
Sydney:
Can you recommend any too??
Saturday, July 16, 2011
Street Food - Pho the Love of It!
Hello again!

Firstly, can I assure you that I don't have an issue with my understanding of what number comes after what.
I've just noticed, upon reflecting on my 'seven blogs in seven days' that the sequencing of the posts seems to be a bit out of whack! I'm going to blame blogger as I can vouch for my own preparation of the said pieces. One comes before two, three four and so on.
But let's not ponder, let's move onto something different and talk about how we can expect our experience of dining out to change as the next phase of food trends embrace us.
We've all travelled, and to some pretty exotic and far away places no doubt. Most of the fun (for me at least) is seeing what the locals eat and in some instances tempting fate (and food poisoning) to try some of the local traditional dishes.
I remember being in Sweden and trying reindeer (poor Rudolph!!) and then eating cloudberries in Norway (oh, what an amazing taste sensation that was).
Closer to home, I just adore a trip down Victoria Street in Richmond (Melbourne) to sample some of the amazing offerings available at the many Vietnamese establishments. The far end of Victoria Street (furtherest away from the CBD), seems to offer the greatest throng of very basic looking eateries (I won't call them restaurants or cafes because I just don't think they are) where you can get some really amazing street food. One dish in particular that can take all of your cares and worries away is Pho (pronounced 'fur).
Pho is everything, all at once - hot, cold, raw, cooked, sweet and sour. Not because it has an identity crisis and can't decide what it wants to be, but more so because this is what the dish is all about....everything!
You start with a base broth which is traditionally beef but can be complemented with the alluring flavours of star anise, cloves and cinnamon. Cardamom can also be substituted.
The next essential addition is rice noodles which can either be fresh or dehydrated. These 'chunk' up the dish but do not detract from the alluring broth's flavour but rather enhance the dining experience.
Now it's time to construct a Pho that is unique to your requirements with the addition of a range of raw ingredients, in varying quantities (entirely up to you, the individual). It's like a smorgasbord at your table without the need for queuing. Who could ask for more...
Sliced beef or chicken and a series of garnishes - bean sprouts, spring onions, fresh chilli, Thai basil, coriander and the pièce de résistance, wedges of lemon or lime. As a result of the final addition of citrus zing, the dish is instantly transformed and offers the diner a cleansing and tangy kick into next week. Pho has been described as one of those dishes that makes life better. Here's a recipe to try to see if it does the trick for you.
Sliced beef or chicken and a series of garnishes - bean sprouts, spring onions, fresh chilli, Thai basil, coriander and the pièce de résistance, wedges of lemon or lime. As a result of the final addition of citrus zing, the dish is instantly transformed and offers the diner a cleansing and tangy kick into next week. Pho has been described as one of those dishes that makes life better. Here's a recipe to try to see if it does the trick for you.

Beef Pho (by Donna Hay with Iron Chef Shellie alterations)
375g flat rice noodles (similar to ones used in pad Thai)
1.5 litres beef stock or consomme
1 star anise
1 cinnamon stick
3 cloves
1 spring onion, cut into 0.5cm pieces (I like to cut mine using scissors)
200g eye fillet, cut paper thin (the best way to do this is to freeze, then cut with a very sharp blade)
1 cup bean sprouts
1 cup Thai bail
2 small red chillies, sliced
Fish sauce lemon wedges, to serve
1.5 litres beef stock or consomme
1 star anise
1 cinnamon stick
3 cloves
1 spring onion, cut into 0.5cm pieces (I like to cut mine using scissors)
200g eye fillet, cut paper thin (the best way to do this is to freeze, then cut with a very sharp blade)
1 cup bean sprouts
1 cup Thai bail
2 small red chillies, sliced
Fish sauce lemon wedges, to serve
Cook the noodles according to packet instructions. Drain and divide between serving bowls.
Place the stock, cinnamon, star anise and cardamon in a saucepan over high heat and bring to the boil. Reduce the heat to low and cook for 5 minutes.
Top the noodles with the spring onion, beef and pour over the stock. The stock will cook the raw eye fillet.
Top the noodles with the spring onion, beef and pour over the stock. The stock will cook the raw eye fillet.
Top with the Thai basil, bean sprouts and chilli.
Add fish sauce and lemon or lime juice to taste.
Serves 4.
If you can't be bothered doing any of this at home, visit Co Do in Melbourne (on Victoria Street, Richmond of course) and enjoy a great splash of Asian street food!
Saturday, July 9, 2011
Jazzing up a Rack of Lamb - BLOG SEVEN in SEVEN DAYS
Well, this is it! The end of my week of daily blogging, capturing a range of stories, facts and recipes. I hope you have enjoyed. This blog should be no exception as I bring to you a savoury offering that turns on of our favourite meats into a star performer.
If we believe Sam Kekovich, we Australian's love our lamb. In fact, it could be considered to be 'unAustralian' to NOT eat our fair share.
Well, I happen to know a number of people who aren't that partial to it. They find it too fatty, have a strong cooking smell and well, they would prefer to eat beef! I must agree, although the right cut is prepared correctly as it was done the other night at Escagrill , it can be a outstanding dish.
For a stunningly good looking presentation, a rack of lamb is a wonderful centrepiece at any special occasion, whether it be for two, or perhaps a party of six. We often see racks crusted up with herbs or the like, however this crusting is a little more Asian inspired and offers a tasty and moist variation. If you are peanut intolerant, this probably isn't for you. Perhaps substitute another nut like cashew (often available in paste form) or even some type of capsicum pesto.
Lamb portioning: allow four chops per person
For paste (covers 8 chops, serving 2 persons):
3 teaspoons soya sauce
1 tablespoon sesame seeds
3 teaspoons tomato paste
3 teaspoons peanut butter
1/4 teaspoon sesame oil
3 teaspoon sugar
2 eschallots, finely chopped
Heat a medium sized frypan for 2 minutes with a brushing of olive oil.
Place the racks fat side down in the frypan and cook for 2 minutes.
Remove to a baking tray lined with baking paper.
Paste mixture evenly across the racks.
Bake in a preheated oven (180 degrees C) for around 25-30 minutes.
Remove from the oven and allow the lamb to rest for a few minutes before cutting the racks to serve.
The lamb should be slightly pink.
My suggestion would be to serve with bok choy, stir fried and dressed in sesame seeds, and maybe honeyed carrots. A wonderful 'unAustralian' version of our so called favourite meat.
And.....avagoodweekend!
I'll see you in a week....! Not tomorrow, not in 24 hours, not Sunday... but next week. I need to sleep!!
If we believe Sam Kekovich, we Australian's love our lamb. In fact, it could be considered to be 'unAustralian' to NOT eat our fair share.
Well, I happen to know a number of people who aren't that partial to it. They find it too fatty, have a strong cooking smell and well, they would prefer to eat beef! I must agree, although the right cut is prepared correctly as it was done the other night at Escagrill , it can be a outstanding dish.
For a stunningly good looking presentation, a rack of lamb is a wonderful centrepiece at any special occasion, whether it be for two, or perhaps a party of six. We often see racks crusted up with herbs or the like, however this crusting is a little more Asian inspired and offers a tasty and moist variation. If you are peanut intolerant, this probably isn't for you. Perhaps substitute another nut like cashew (often available in paste form) or even some type of capsicum pesto.
Lamb portioning: allow four chops per person
For paste (covers 8 chops, serving 2 persons):
3 teaspoons soya sauce
1 tablespoon sesame seeds
3 teaspoons tomato paste
3 teaspoons peanut butter
1/4 teaspoon sesame oil
3 teaspoon sugar
2 eschallots, finely chopped
Heat a medium sized frypan for 2 minutes with a brushing of olive oil.
Place the racks fat side down in the frypan and cook for 2 minutes.
Remove to a baking tray lined with baking paper.
Paste mixture evenly across the racks.
Bake in a preheated oven (180 degrees C) for around 25-30 minutes.
Remove from the oven and allow the lamb to rest for a few minutes before cutting the racks to serve.
The lamb should be slightly pink.
My suggestion would be to serve with bok choy, stir fried and dressed in sesame seeds, and maybe honeyed carrots. A wonderful 'unAustralian' version of our so called favourite meat.
And.....avagoodweekend!
I'll see you in a week....! Not tomorrow, not in 24 hours, not Sunday... but next week. I need to sleep!!
Friday, July 8, 2011
Winter Warmer - BLOG SIX in SEVEN DAYS
We are now on the home stretch. Just one day to go beyond today before my SEVEN BLOG session comes to a close. I’m looking forward to my one a week blog returning soon as this has been a big effort, especially with so much else happening in my life. I’m still looking for that elusive full time job (missed out on one role and awaiting a final interview for another) so let’s hope that something ‘gives’ soon.
I feel as though I have been bombarding you with sweet treats, and this blog is no exception. I have been asked (thank you Helen) to recommend a good dessert recipe and given that it is winter across Australia (some areas cooler than others, 9 degrees in Melbourne this morning although felt like around 5 to me) I can’t help but think of something a bit stodgy and hearty and British desserts tick all of the boxes in this department.
I made this recipe a few years ago and it still sticks in my memory. Even though berries aren’t readily available during the winter, the frozen ones in the supermarket really are particularly good. You can also substitute other ‘seasonal’ fruits like apples (so many varieties to choose from), strawberries and even blood oranges. Just pick things that have a juice component to them as this helps with the cooking process. Apples are such a great baked item. I was in Hobart last weekend and the selection of apples and pears available at Salamanca Markets was spectacular. 

 The great thing is that you can bring these back into Victoria (but Tassie is quite particular in the reverse, and no food items can be taken into their own State). On a side note, I even got to see the Gourmet Farmer, Matthew Evans, working hard at his staff. I’d seen him on the SBS series but to see him ‘for real’ was a treat. The other treat, was a visit to MONA on the Sunday. If you have any interest in contemporary and uninhibited art, then this is the place for you!
Fruit Cobbler Recipe (a Jamie Oliver classic)
Ingredients
For the fruit:
2 apricots, stoned and sliced
1 pear, cored and thickly sliced
1 pint blackberries
1 pint blueberries
1 pint raspberries
1 stick rhubarb
5 tablespoons sugar
A good glug balsamic vinegar
For the topping:
125g butter, chilled
225 grams self-rising flour
70 grams sugar
A large pinch salt
130 millilitres buttermilk (you can make your own buttermilk by adding 1 teaspoon of vinegar to standard milk)
A little sugar, for dusting
Vanilla ice cream or double cream, as an accompaniment
Directions
Preheat the oven to 190 degrees C. Put the fruit into a pan with the sugar and the balsamic vinegar. Put the pan over the heat, and cook gently, until the juices begin to run from the berries. Pour into an ovenproof dish.
Meanwhile make the topping. Rub the cold butter into the flour until the mixture resembles fine bread crumbs. Add the sugar and salt, stir well, and then add the buttermilk to form a loose, scone-type mixture. Roll balls of the dough and place randomly over the hot fruit. Sprinkle with a little sugar, and bake in the oven for 30 minutes until golden brown. Serve with vanilla ice cream.
Monday, July 4, 2011
Triumphant Biscotti - BLOG FOUR in SEVEN DAYS
When we think of Italian food, we are more akin to think of pasta, pizza, antipasto and perhaps the famed Tiramisu.
However, after attending a top notch food and wine tasting recently, I discovered that sweet treats in the form of biscotti heralded my appreciation for the twice baked Italian bickie!
There are many variations of this nut filled biscuit, the traditional being with almonds. As with most almond filled Italian treats, amaretto is also used and I must admit, I'm not a big fan. It's the same as marzipan. Yick!!! I prefer to keep things a la natural and stick to a biscuit filled with almonds rather than any essence flavouring.
Other variations include pine nuts and even a scrummy one I tried in Brisbane with fennel seeds. Sounds interesting and it was - moorish in fact!A bit of history for you! The first documented recipe for the cake was found in a centuries-old manuscript, now preserved in the State of Prato. Depending on what region of Italy they come from, biscotti can be called cantuccini, usually suggesting origins from the Tuscany region.
It doesn't matter where the following variation comes from, it takes bloody fabulous every time I've made it. In fact, it has been given the name 'triumphant' courtesy of an old boss who scored some for Christmas last year. This is for you, Ted!
Hazelnut and Chocolate Biscotti
1 and 1/4 cups plain flour
1/4 teaspoon bicarbonate of soda
1/4 teaspoon baking powder
1/2 teaspoon salt
2 teaspoons instant espresso coffee powder or granules
80g toasted whole hazelnuts
120g good quality dark chocolate, broken into little chunks
125g unsalted butter, at room temperature
1 cup castor sugar
2 small eggs, lightly beaten
1 and 1/2 teaspoons vanilla extract
Preheat oven to 180 degrees C.
Put the flour, soda, powder and salt into a bowl.
Sift the coffee into the same bowl and whisk all of these ingredients together for 1 minute.
With an electric mixer, beat butter and sugar together for 6 minutes in total, scrapping down the side of the bowl during this process.
Drizzle in the beaten eggs a little at a time, beating after each addition. Do the same with the vanilla.
Reduce the speed and add the flour mixture, a bit at a time, until a soft dough forms.
Scrape dough onto a board and divide it in half.
Roll each half into a log shape about 26cm long. If the dough is a little sticky, chill for a short while to firm it up.
Transfer onto a prepared tray (preferably with baking paper) but make sure there is around 6-7cm between each log as during the cooking process, they will flatten and spread.
Bake for 35 minutes or until they begin to go golden brown.
Remove from the oven and allow to cool. Turn the oven down to 160 degrees C and line two more trays with baking paper.
The logs should still be a little warm when you begin to cut them into 7mm thick slices with a sharp knife. You may need to hold the logs quite firmly with your hands as you perform this process.
Lay the slices on the prepared baking trays and return to the oven for another 15 minutes.
Once this process is complete, leave the biscotti on the trays to cool completely and they will be crisp to touch once this has occurred.
The only hassle with this recipe is that you won't be able to stop eating them. Just think that the dark chocolate is good for you - that's how I justify it! Enjoy, literally!
Insist on Aussie Garlic! BLOG FIVE in SEVEN DAYS
I had some technical 'issues' yesterday which explains why you didn't get your Blog Four on time. Hopefully you are all still with me on this mini-epic journey of food discovery. Here's to Blog Five.....


Whole Roast Cloves of Garlic
This is the easy part.
Can you imagine being allergic to garlic?
I met a guy a few years ago now who had such an adverse reaction to the stuff, that he would be instantly sick. After consuming his fair share of Red Rooster garlic bread, when growing up, he is now off the stuff for life. I can't help but think that it has more to do with how the garlic is stored and treated to preserve its shelf life, than the actual clove itself.
Garlic is used in cuisines the world over, and with its popularity continuing to grow (12,000,000 tonnes is produced each year worldwide), today's consumer is better informed about its quality than ever before - and so we should be - we are, after all, putting it into our bodies.
Until about 20 years ago, Australia’s agricultural industry included garlic drops, but when China began importing garlic into the Australian market, our growers couldn’t compete with their price and the rest is history. Suddenly we the consumer were forced to eat a product that we didn’t know a great deal about, in terms of growth, harvest, production, treatment and storage.
It is widely known that imported garlic has to be fumigated with methyl bromide (by AQIS) and is often bleached. In China, chemicals banned in Australia are still being used to grow garlic and given that Australia imports 95% of our garlic from China, this is worrying information. As is the fact that Chinese garlic is gamma irradiated to prevent sprouting and is also sprayed with Maleic Hydrazide to extend shelf life.
Until about 20 years ago, Australia’s agricultural industry included garlic drops, but when China began importing garlic into the Australian market, our growers couldn’t compete with their price and the rest is history. Suddenly we the consumer were forced to eat a product that we didn’t know a great deal about, in terms of growth, harvest, production, treatment and storage.
It is widely known that imported garlic has to be fumigated with methyl bromide (by AQIS) and is often bleached. In China, chemicals banned in Australia are still being used to grow garlic and given that Australia imports 95% of our garlic from China, this is worrying information. As is the fact that Chinese garlic is gamma irradiated to prevent sprouting and is also sprayed with Maleic Hydrazide to extend shelf life.
Surely all of this can’t be good for us?!
The great news is that the Australian garlic market is back!!! With virus free garlic varieties from France now being cultivated, we have a real opportunity of ensuring that consumers (ie you and me!!!) have the opportunity to choose where our garlic comes from.
Damian Pike at Prahran Markets has a wonderful supply of Australian garlic – raw and real to look at, I can just imagine how good it tastes!
The great news is that the Australian garlic market is back!!! With virus free garlic varieties from France now being cultivated, we have a real opportunity of ensuring that consumers (ie you and me!!!) have the opportunity to choose where our garlic comes from.
Damian Pike at Prahran Markets has a wonderful supply of Australian garlic – raw and real to look at, I can just imagine how good it tastes!
At a recent trip to Tasmania, I also saw plentiful supplies of Aussie garlic available at the Salamanca Markets.
Australia currently imports in the region of 10,000 tonnes of garlic per year with the majority of this coming from China but with an increasing amount is now from Spain, Argentina, Mexico and the USA. Unfortunately, much of this product does not conform to the production standards and procedures set for Australian growers.
Whole Roast Cloves of Garlic
This is the easy part.
Preheat an oven to 160 degrees C.
Lay a piece of alfoil out on a bench and put a whole knob of garlic into the centre.
Gently force open the top of the knob with either a knife or your fingers.
Pour a liberal amount of olive oil into the head and bring the alfoil up around it so capture the oil and create almost a confit cocoon!
Cook in the preheated oven for around 25 minutes and set aside once done.
Green pea soup with roast garlic creme fraiche
Ingredients
8 garlic cloves
180g (2/3 cup) creme fraiche, (King Island brand)
2 tbs olive oil
2 tbs butter
1 large brown onion, halved, chopped
500g fresh peas, shelled (or defrosted, frozen peas) – this also works with split peas
375ml (1 1/2 cups) chicken stock
Freshly ground black pepper
180g (2/3 cup) creme fraiche, (King Island brand)
2 tbs olive oil
2 tbs butter
1 large brown onion, halved, chopped
500g fresh peas, shelled (or defrosted, frozen peas) – this also works with split peas
375ml (1 1/2 cups) chicken stock
Freshly ground black pepper
Method
1. Place roasted garlic cloves in a small bowl and lightly mash. Add creme fraiche and stir until combined. Cover with plastic wrap and place in the fridge until required.
3. Meanwhile, heat the olive oil and butter in a large frying pan over medium heat. Add the onion and cook, stirring, for 5 minutes or until soft. Add fresh or defrosted peas and chicken stock. Increase heat to high and bring to the boil. Boil for 5 minutes or until the peas are bright green and tender. Remove from the heat and set aside for 5 minutes to cool slightly.
4. Pour the soup into the bowl of a food processor and process until smooth. Taste and season with pepper.
5. Ladle the soup into serving bowls. Top with a dollop of the roast garlic creme fraiche and sprinkle with pepper.
1. Place roasted garlic cloves in a small bowl and lightly mash. Add creme fraiche and stir until combined. Cover with plastic wrap and place in the fridge until required.
3. Meanwhile, heat the olive oil and butter in a large frying pan over medium heat. Add the onion and cook, stirring, for 5 minutes or until soft. Add fresh or defrosted peas and chicken stock. Increase heat to high and bring to the boil. Boil for 5 minutes or until the peas are bright green and tender. Remove from the heat and set aside for 5 minutes to cool slightly.
4. Pour the soup into the bowl of a food processor and process until smooth. Taste and season with pepper.
5. Ladle the soup into serving bowls. Top with a dollop of the roast garlic creme fraiche and sprinkle with pepper.
Tuesday, June 28, 2011
What really is a Caper??? - Blog Two in Seven Days
So, what a is this little thing called a caper...?

Well, according to Wikipedia, they come from the caper bush (how apt, given that Australia is full of 'bush'), a perennial winter-deciduous species that bears rounded, fleshy leaves and large white to pinkish-white flowers.
A caper is the pickled bud of this plant. The caper bush is well suited to Mediterranean countries and it just so happens that many parts of regional Victoria also offer similar climatic conditions. Yay for Australia - we really are so self sufficient!
The first caper I knew came in a jar, in very salty brined water. Nowadays, capers are available in a salt preserve which I think helps maintain their authentic flavour and offers more versatility.
You simply wash the little delights in running water to remove most of the salt preserve and then go about using them with anything from smoked salmon, baked fish or even in a rich tomato based puttanesca sauce. Puttanesca is said to be prepared in the style of prostitutes in Rome: deliberately robust in scent and hearty in flavour so as to attract clients. Sorry, hope that hasn't turned any of you off trying this dish....
Here's my tried and true recipe:
Spaghetti Puttanesca
500g spaghetti
1/3 cup extra virgin olive oil
3 cloves garlic, crushed
1 teaspoon dry chilli flakes
2 cans (800g) whole tomatoes, juice reserved, and crushed
200g seeded kalamata olives
8 anchovy fillets, chopped coarsely (perhaps try the white anchovy fillets, available at most good delicatessens)
1/3 cup rinsed drained capers
1/3 cup coarsely chopped parsley
2 tablespoons finely shredded fresh basil
Cook pasta in a large saucepan of boiling, salted water (uncovered) until just tender.
Heat oil in large frying pan and cook garlic, stirring until fragrant. Watch the heat here as the garlic can burn.
Add chilli and tomatoes, cook for around 5 minutes.
Add remaining ingredients and cook for a further 5 minutes until the sauce slightly thickens.
Add drained pasta and toss gently to combine.
This dish is relatively low in fat and kilojules so 'hoe in' while the capers are fresh and ready!
Saturday, June 25, 2011
Warming the House this Winter.... - BLOG THREE in SEVEN DAYS
I was recently invited to write a guest blog for a friend who has a craft business Stylise.
I have wordsmithed it now and thought you might be interested in seeing the contents.
Crafty creating extends to all levels in our homes, even to the point where you can creatively clean. Don’t ask me how but some use creativity just to get through the vacuuming and the dusting. I think it involves music and the concept of exercising as you go. Why not, I say?? So long as you are seeing results, that's all that counts.
As a foodie, my creative outlet extends to the kitchen and the creation of a range of tasty morsels for every meal of the day, and a few in between. Goodness, I'm sounding a bit like Nigella Lawson eating my way through the day. However, I can assure you that I have NEVER felt the need for a midnight snack of freshly made bread and butter pudding as I saw her do on an episode not so long ago. I mean, please, really????
Warming the house with a toasty oven combined with the fresh smells of baked cakes, slices, scones, and puddings is my ideal way of spending a Sunday afternoon in winter. And doing it the simplest and tastiest way is what I'd like the share with you now. As I write these words, the lingering smell of caramelised butter and brown sugar hangs in the air and I know that what I've just cooked took such little time yet will give so much pleasure, served with a cup of tea of coffee and some good, easy conversation.
It's a recipe from my Mother's kitchen, and being a home economics teacher by profession, I know that it's tried and true. I've chosen this recipe for a number of reasons - it's easy (one saucepan wonder!), it has SIX ingredients (Suzie, place photo here) and its seasonal, something that I continually promote as my preferred way of eating. Walnuts are an autumn/winter crop therefore supply is fresh and plentiful at the moment. I wrote a blog about berries in the Summer and the abundant supply I found when visiting the High Country of Victoria. In the cooler months, the walnuts become the staple harvest of the farmers in this region and we are lucky to be able to source these here in Melbourne and further afield.
As a foodie, my creative outlet extends to the kitchen and the creation of a range of tasty morsels for every meal of the day, and a few in between. Goodness, I'm sounding a bit like Nigella Lawson eating my way through the day. However, I can assure you that I have NEVER felt the need for a midnight snack of freshly made bread and butter pudding as I saw her do on an episode not so long ago. I mean, please, really????
Warming the house with a toasty oven combined with the fresh smells of baked cakes, slices, scones, and puddings is my ideal way of spending a Sunday afternoon in winter. And doing it the simplest and tastiest way is what I'd like the share with you now. As I write these words, the lingering smell of caramelised butter and brown sugar hangs in the air and I know that what I've just cooked took such little time yet will give so much pleasure, served with a cup of tea of coffee and some good, easy conversation.
It's a recipe from my Mother's kitchen, and being a home economics teacher by profession, I know that it's tried and true. I've chosen this recipe for a number of reasons - it's easy (one saucepan wonder!), it has SIX ingredients (Suzie, place photo here) and its seasonal, something that I continually promote as my preferred way of eating. Walnuts are an autumn/winter crop therefore supply is fresh and plentiful at the moment. I wrote a blog about berries in the Summer and the abundant supply I found when visiting the High Country of Victoria. In the cooler months, the walnuts become the staple harvest of the farmers in this region and we are lucky to be able to source these here in Melbourne and further afield.

Date & Walnut Slice
125g butter
100g brown sugar
3/4 cup fresh walnuts, chopped
3/4 cup fresh dates, pitted and chopped
1 egg, well beaten
1 cup self raising flour
125g butter
100g brown sugar
3/4 cup fresh walnuts, chopped
3/4 cup fresh dates, pitted and chopped
1 egg, well beaten
1 cup self raising flour
Preheat your oven to 180 degrees and grease and line a lamington tin (28cm x 18cm).
In a medium sized saucepan, heat butter and brown sugar.
Stir continuously once the butter starts to melt to ensure the two ingredients mix well together and not stick or burn to the bottom of the saucepan.
Remove from heat once well combined and add dates.
Add walnuts and mix well again.
Let it stand for around 2 minutes before adding the egg (adding an egg to a hot mixture will cook the egg!! - nobody wants scrambled slice!!).
Add the flour and mix til all ingredients are well combined.
Spread across the lamington tin - I find that I prefer to not fill the entire tin so end up leaving one of the ends short by around an inch (make sense??). Don't be concerned that the mixture, when cooked will spread to the end of the tin, as it won't.
Cook in the oven for around 20 minutes - check after 15 minutes as the time can vary according to ovens. You should know by the delicious aroma wafting through your house and the lovely golden brown colour of the finished product.
Fresh out of the oven, the slice will be soft to touch but will firm up as it cools.
Once cool, spread with either lemon or orange icing.
In a medium sized saucepan, heat butter and brown sugar.
Stir continuously once the butter starts to melt to ensure the two ingredients mix well together and not stick or burn to the bottom of the saucepan.
Remove from heat once well combined and add dates.
Add walnuts and mix well again.
Let it stand for around 2 minutes before adding the egg (adding an egg to a hot mixture will cook the egg!! - nobody wants scrambled slice!!).
Add the flour and mix til all ingredients are well combined.
Spread across the lamington tin - I find that I prefer to not fill the entire tin so end up leaving one of the ends short by around an inch (make sense??). Don't be concerned that the mixture, when cooked will spread to the end of the tin, as it won't.
Cook in the oven for around 20 minutes - check after 15 minutes as the time can vary according to ovens. You should know by the delicious aroma wafting through your house and the lovely golden brown colour of the finished product.
Fresh out of the oven, the slice will be soft to touch but will firm up as it cools.
Once cool, spread with either lemon or orange icing.
I love this recipe and I hope you do too!
Happy cooking...and happy eating!
Happy cooking...and happy eating!
'Tis the Season - for Muffins
Hello!
It's been a while and safe to say, life has been incredibly hectic, unsettled and testing my resolve to just 'be' with the moments as they pan out before me.
One thing that has been constant through all of the chaos is my consumption of food. My appetite post transplant has been ravenous which, apparently is a good thing, and a result of one of my medications.
And for you, the reader, this is a good thing. I am in the kitchen almost daily cooking up and sampling new and wonderful things.
This blog will be the first of my personal challenge to prepare SEVEN BLOGS IN SEVEN DAYS.
It is dedicated not just to muffins, but to a rather unlikely and under-used ingredient that goes very well in this warming winter treat, wheterh you have it for breakfast or as an afternoon delight with coffee or tea......and that ingredient is the humble PERSIMMON.

Native to China, the Fuyu Persimmon is the most commonly available variety and is rich in health promoting nutrients such as vitamins, minerals and anti-oxidants that are vital for optimum health.
Persimmons contain many health benefiting anti-oxidants as well as an anti-tumor compound.
Fresh permissions contain anti-oxidant compounds like vitamin-A, beta carotene, lycopene, along with others which function as protective scavengers against free radicals and play a role in ageing and various disease processes.
When I visited my local working week cafe (Eclipse) recently, they were serving up a muffin that wasn't just your standard offering, rather a seasonal offering containing persimmon and apple.
I mentioned on Facebook recently that I would share this muffin recipe with you as it's easy, tasty and a great way to sample persimmons, a fruit that I myself had not tried previously.
Persimmon and Apple Muffins
2 cups plain flour
3 teaspoons baking powder
1/2 teaspoon salt
2/3 cup caster sugar (you can now buy raw caster sugar which is less refined)
1 egg
250ml low fat milk
3 tablespoons vegetable oil (I use rice bran oil)
Preheat oven to 200 C
Stir together flour, baking powder, salt and sugar in a large bowl
Make a well in the centre.
In a small bowl, beat egg with a fork.
Stir in milk and oil.
Pour all at once into well and mix quickly and lightly WITH A FORK.
Do not overbeat. The mixture should be thick and lumpy - don't worry if there are some areas of flour not mixed in.
Now mix in your persimmon and apple. Use 1/2 cup of each. With the persimmon, use a semi soft fruit and peel the skin so that only the flesh is used.
Spoon the mixture into well greased muffin pans or alternatively, use the silicon muffin cups that are readily available on the market. Makes the whole process SOOOO easy.
Bake in the preheated oven for 25 minutes or until firm in the centre and golden brown on top.
It's been a while and safe to say, life has been incredibly hectic, unsettled and testing my resolve to just 'be' with the moments as they pan out before me.
One thing that has been constant through all of the chaos is my consumption of food. My appetite post transplant has been ravenous which, apparently is a good thing, and a result of one of my medications.
And for you, the reader, this is a good thing. I am in the kitchen almost daily cooking up and sampling new and wonderful things.
This blog will be the first of my personal challenge to prepare SEVEN BLOGS IN SEVEN DAYS.
It is dedicated not just to muffins, but to a rather unlikely and under-used ingredient that goes very well in this warming winter treat, wheterh you have it for breakfast or as an afternoon delight with coffee or tea......and that ingredient is the humble PERSIMMON.
Native to China, the Fuyu Persimmon is the most commonly available variety and is rich in health promoting nutrients such as vitamins, minerals and anti-oxidants that are vital for optimum health.
Persimmons contain many health benefiting anti-oxidants as well as an anti-tumor compound.
Fresh permissions contain anti-oxidant compounds like vitamin-A, beta carotene, lycopene, along with others which function as protective scavengers against free radicals and play a role in ageing and various disease processes.
When I visited my local working week cafe (Eclipse) recently, they were serving up a muffin that wasn't just your standard offering, rather a seasonal offering containing persimmon and apple.
I mentioned on Facebook recently that I would share this muffin recipe with you as it's easy, tasty and a great way to sample persimmons, a fruit that I myself had not tried previously.
Persimmon and Apple Muffins
2 cups plain flour
3 teaspoons baking powder
1/2 teaspoon salt
2/3 cup caster sugar (you can now buy raw caster sugar which is less refined)
1 egg
250ml low fat milk
3 tablespoons vegetable oil (I use rice bran oil)
Preheat oven to 200 C
Stir together flour, baking powder, salt and sugar in a large bowl
Make a well in the centre.
In a small bowl, beat egg with a fork.
Stir in milk and oil.
Pour all at once into well and mix quickly and lightly WITH A FORK.
Do not overbeat. The mixture should be thick and lumpy - don't worry if there are some areas of flour not mixed in.
Now mix in your persimmon and apple. Use 1/2 cup of each. With the persimmon, use a semi soft fruit and peel the skin so that only the flesh is used.
Spoon the mixture into well greased muffin pans or alternatively, use the silicon muffin cups that are readily available on the market. Makes the whole process SOOOO easy.
Bake in the preheated oven for 25 minutes or until firm in the centre and golden brown on top.
Blog Number 1 down, 6 to go...... back to you tomorrow!
Sunday, May 29, 2011
When my Brother came to town....
Visiting family is always a great excuse to peruse The Age Good Food Guide, pick a top notch restaurant (so many to choose from) and eventually heading out to reap the spoils.
Starting at the Spice Market at the basement of the Grand Hyatt, we enjoyed 2 for 1 drinks (on a Saturday night(!!!!), business must be slow...) then headed up to the road to 101 Collins Street, some of Melbourne's most highly prized commercial real estate.
Entering through the back dooron Flinders Lane, the building lay sleepy aside from a bustling corner of the ground floor, where The Italian - no, not just one person - but an institution that caters to suits, bruts and possibly everything in between. It almost felt like we were entering an enclave of Melbourne's maffia without even knowing it.
But this story isn't about reviewing this asteemed restaurant but more so, bringing into high regard the humble 'sides'. Yes, that dish that wait staff do the upsell on, the one that used to come on the plate without the diner needing to pay extra for.
It's such a shame that suddenly, the 'three veg' we take for granted as part of an ideal balanced diet is pushed into the realm as something that is considered an added extra to many meals we enjoy around town.
Instead, these dishes are a testament to the season in question as this is when fresh ingredients really do shine.
At The Italian, we enjoyed a side of brussel sprouts a vegetable that you either love or hate. It conjures up tastes and smells that can remind us of 'God love her' our Nana's Sunday roasts where this humble vegetable was possibly a little (meaning a lot) overcooked so that we could effectively suck the contents through our front teeth. Having spent time in the UK, I've experienced this first hand and I'm surprised that I still speak favourable of this mini-cabbage like winter vegetable. On this dining occasion, the sprouts were cooked perfectly and served with smoked ham hock which was an ideal combination...and with the obligatory lemon wedge on the side, it was a dish worth having.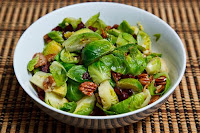
So, in celebrating the reincarnation of this important part of our dining experience, here are a couple of recipes that could very well change your own view of the added extra to your main meal.
Sprouts with mustard & cumin
500g brussel sprouts
3 teaspoon olive oil
1/2 teaspoon mustard seeds
1/2 teaspoon cumin seeds
2 cloves garlic
1/ teaspoon cayenne pepper
Salt & pepper to taste
Cook sprouts and reserve 2/3 cup of the cooking water.
Heat oil and add mustard seeds.
Cover pan as seeds will jump around. This should take a couple of minutes.
Add cumin, garlic and cayenne in that order. Stir fry for 1 minute.
Add sprouts and cook 2-3 minutes.
Pour in reserved stock and simmer til stock has reduced by half.
Top with toasted, flaked almonds and a wedge of lemon on the side.
Parisian Peas (this is self named, just because...it sounds romantic!)
350g fresh, podded peas or the equivalent frozen peas
100g smoked bacon, diced into 1/2 cm pieces (you can buy it ready cut or use lardons or pancetta cubes)
3 shallots, peeled and finely chopped
100ml vegetable stock (a cube will do)
250ml double cream
A good knob of butter
Salt and freshly ground black pepper
100g smoked bacon, diced into 1/2 cm pieces (you can buy it ready cut or use lardons or pancetta cubes)
3 shallots, peeled and finely chopped
100ml vegetable stock (a cube will do)
250ml double cream
A good knob of butter
Salt and freshly ground black pepper
Cover the peas with boiling salted water and add a good knob of butter and a couple of teaspoons of sugar.
Simmer for 5-6 minutes until tender, then drain them in a colander.
Meanwhile in a larger saucepan gently cook the shallots and bacon in a little butter without colouring until soft.
Add the vegetable stock and simmer until it has completely reduced.
Add the double cream, season with freshly ground black pepper and simmer the cream until it has reduced by half.
Add the peas and continue to simmer until the sauce is just coating the peas.
Add the butter and more salt and pepper if necessary.
Friday, May 6, 2011
Blind-folded Vegie Stock
In my previous blog, I referred to an easy vegetable stock recipe that even the most novice cook could prepare, hence the reason for referring to it as a blind-folded' stock.
Aside from water base, there are THREE ingredients to chop and then you are on your way to a home made base for soups, risottos or even deglazing a pan after cooking meat.
You will need:
1 leek, roughly chopped
1 celery stalk, roughly chopped
1 onion, roughly chopped
Cover all ingredients with 1 litre of water in a saucepan over high heat.
Add 1 teaspoon of salt and bring to the boil.
Reduce the heat and simmer for 20 minutes.
Strain the vegetables and discard.
Use immediately or cool and transfer into smaller containers for freezing.
To increase the complexity of the stock, you can add other vegetables such as carrots or garlic, plus bay leaves and peppercorns can also be used.
Aside from water base, there are THREE ingredients to chop and then you are on your way to a home made base for soups, risottos or even deglazing a pan after cooking meat.
You will need:
1 leek, roughly chopped
1 celery stalk, roughly chopped
1 onion, roughly chopped
Cover all ingredients with 1 litre of water in a saucepan over high heat.
Add 1 teaspoon of salt and bring to the boil.
Reduce the heat and simmer for 20 minutes.
Strain the vegetables and discard.
Use immediately or cool and transfer into smaller containers for freezing.
To increase the complexity of the stock, you can add other vegetables such as carrots or garlic, plus bay leaves and peppercorns can also be used.
Get stuck into the funghi!
 Autumn is well and truly here, especially in Melbourne (mentioned, for the purposes of my non-Victorian followers).
And, there's not too many cities in the world where you can be driving down a significant traffic thoroughfare (Royal Parade) and see mushrooms popping up on either side of the road. In fact, even saw a pedestrian taking photos of the little marvels - very quaint and got me thinking about how versatile this ingredient is. You can fry them, bake them, mix them in sauces, stick them on pizzas, have them for breakfast lunch or dinner, you can even eat them raw.... there's not too many of nature's gifts that share this versatility.
And there are so many different varieties available, each with their own unique flavour. Slipper jacks, pine mushrooms, swiss, enoki, shitake, or just your stock standard button mushroom - they all have great use, especially at this time of year when supply is at a premium.
A couple of years ago, on a cold May day (completely rugged up) I went mushroom hunting down on the Mornington Peninsula and found the experience to be so interesting (and fun). It's amazing how much you can discover simply by getting down amongst the leaf litter below the massive and majestic pine trees. 
And after the hunt, how well did a glass of pinot noir match itself to these morsels which we enjoyed as ingredients in soup, tarts and pizzas.
And after the hunt, how well did a glass of pinot noir match itself to these morsels which we enjoyed as ingredients in soup, tarts and pizzas.
So here comes my recipe choice to share with you all. It's a Jamie Oliver special that I've cooked a number of times and each time, it's as good as the last. As a lover of beef stoganoff, I think the name of the soup allured me first up, but then the ease of the method made it a staple in my winter soup collection. The addition of rice as a thickener ensures this is a hearty soup to be enjoyed in front of the TV on a Sunday night - with a glass of pinot of course!
Mushroom Stroganoff Soup
40g unsalted butter
1 garlic clove, sliced
1kg mixed mushrooms (swiss, oyster, brown) chopped
1 red onion, chopped
2 celery stalks, trimmed and finely chopped
2 bay leaves (great for flavour)
2 litres chicken or vegetable stock (see my next post about making your own stocks)
1/2 cup white rice
150ml sour cream
zest of 1 lemon
small bunch of flat leaf parsley, finely chopped
freshly ground nutmeg, to sprinkle
Here's how to cook it!
Melt the butter in large saucepan, over medium heat.
Stir in garlic.
Add mushrooms and fry for 4-5 minutes.
Season with good quality salt (I use celtic sea salt).
Add onion and celery and cook for a further 3-4 minutes.
Add bay leaves, stock and rice and bring to the boil.
Simmer over medium heat for 20 minutes or until rice is cooked.
Discard bay leaves and blend soup.
Mix sour cream and lemon zest together.
Stir in a few drops of lemon juice and some salt for extra flavour.
Ladle soup into bowls and swirl in a spoonful of sour cream mixture
Sprinke soup with olive oil, parsley and a pinch of nutmeg.
If you like, you can reserve 1/3 of the cooked mushrooms and serve these on top of some grilled ciabatta bread on the side. I don't know about you, but I just love dunking bread into soup. It's so wholesome....
And, if you have access to truffle oil, go on, splurge!!! Add some to the soup in the cooking process. The flavour just takes things to a whole new level.
Enjoy!!
Friday, April 29, 2011
Literary Baking
I'm reading a quirky little book at the moment (given to me to help with my recent recouperation) titled 'Lunch in Paris'. The subtitle reads: A Love Story with Recipes.... It's by Elizabeth Bard.
Ce La Vie.... Say no more.....
Not only is the storyline light, fresh and funny, but the recipes that intertwine the story line actually make you want to try them. There's a mix of both savoury and sweet and all sound tempting and do-able.
I was in the baking mode yesterday and had all of the ingredients necessary to try the yoghurt cake - a cake described as a blank canvas meaning you can top it with what you like - pear, apple, raspberry, tinned fruit etc. I had some frozen raspberries and I liked the idea of mixing some 'tart' with the sweetness of the cake batter.
I hope you enjoy it as much I did (yes, it's almost all gone, with the help of my housemate and a friend who came for lunch). Oh, and Audrey (my pooch) got a little bit as well.
Yogurt Cake
1 cup plain yogurt (I used Greek style)
1 cup sugar
pinch of sea salt
1 teaspoon vanilla extract (I used the seeds from a vanilla pod)
1/3 cup vegetable oil (light oil is best, I used rice bran oil)
2 eggs
1 & 2/3 cups plain flour
1 & 1/2 teaspoons baking powder
1 teaspoon baking soda
zest of lemon
topping of your choice
Preheat your oven to 160 degrees. My suggestion is to NOT use fan forced.
Lightly brush oil over the inside of a 10 inch round cake pan.
Line with baking paper.
Mix together the yogurt, sugar, salt and vanilla and whisk until smooth.
Add the oil in a steady stream and whisk again til combined.
Add the eggs one at a time, whisking after each addition.
Sift together the flour, baking powder and baking soda.
Add to the yogurt mixture, mix till combined then add the lemon zest.
Transfer to lined cake tin and top with chosen topping.
Bake in centre rack of oven for 45 minutes or until a toothpick comes out of the centre clean.
Lift cake from tin to cool.
Storage: as this cake gets moister with age, try to avoid storing in an airtight container. Best way to store is to wrap in aluminium foil and keep at room temperature.
And here's a picture.....

Ce La Vie.... Say no more.....
Not only is the storyline light, fresh and funny, but the recipes that intertwine the story line actually make you want to try them. There's a mix of both savoury and sweet and all sound tempting and do-able.
I was in the baking mode yesterday and had all of the ingredients necessary to try the yoghurt cake - a cake described as a blank canvas meaning you can top it with what you like - pear, apple, raspberry, tinned fruit etc. I had some frozen raspberries and I liked the idea of mixing some 'tart' with the sweetness of the cake batter.
I hope you enjoy it as much I did (yes, it's almost all gone, with the help of my housemate and a friend who came for lunch). Oh, and Audrey (my pooch) got a little bit as well.
Yogurt Cake
1 cup plain yogurt (I used Greek style)
1 cup sugar
pinch of sea salt
1 teaspoon vanilla extract (I used the seeds from a vanilla pod)
1/3 cup vegetable oil (light oil is best, I used rice bran oil)
2 eggs
1 & 2/3 cups plain flour
1 & 1/2 teaspoons baking powder
1 teaspoon baking soda
zest of lemon
topping of your choice
Preheat your oven to 160 degrees. My suggestion is to NOT use fan forced.
Lightly brush oil over the inside of a 10 inch round cake pan.
Line with baking paper.
Mix together the yogurt, sugar, salt and vanilla and whisk until smooth.
Add the oil in a steady stream and whisk again til combined.
Add the eggs one at a time, whisking after each addition.
Sift together the flour, baking powder and baking soda.
Add to the yogurt mixture, mix till combined then add the lemon zest.
Transfer to lined cake tin and top with chosen topping.
Bake in centre rack of oven for 45 minutes or until a toothpick comes out of the centre clean.
Lift cake from tin to cool.
Storage: as this cake gets moister with age, try to avoid storing in an airtight container. Best way to store is to wrap in aluminium foil and keep at room temperature.
And here's a picture.....
Subscribe to:
Posts (Atom)